

In the previous phase we made all the required preparations. In this phase we will:
- Define connection settings.
- Add API client objects.
- Add API to communicate with the anyLogistix project.
- Run the created application and observe its results.
Let us start with defining connection settings within our class with a set of constants.
Define connection settings
-
Define the address of your anyLogistix Professional server in your ApiTutorialPhase1 class by adding the following constant:
public static final String ALX_SERVER_ADDRESS = "https://your-server-address-here.com/api/v1"; - Copy your server URL from the browser address bar, and replace the dummy url with it in the just added constant.
-
Define your API key by adding the following constant:
public static final String ALX_API_KEY = "your-api-key-here"; -
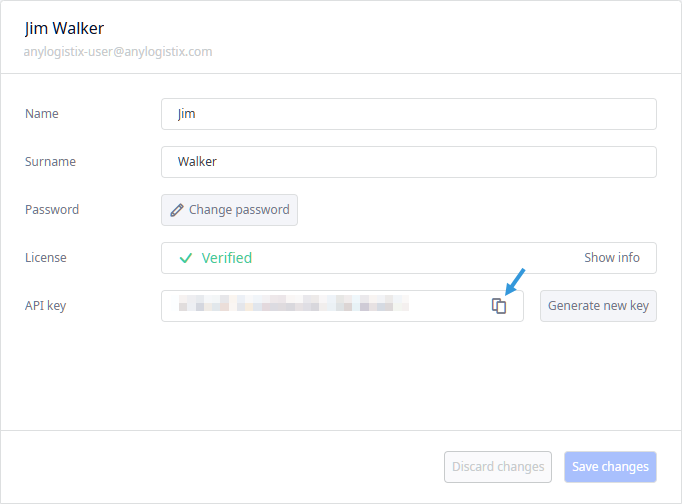
Now copy your API Key:
-
In the anyLogistix toolbar click
 and select
 Control panel.
- Click the PERSONAL DATA tab to open the PERSONAL DATA section.
-
Now click the
 Copy icon in the API key field to copy the API key.
-
In the anyLogistix toolbar click
- Replace the dummy API key with your API key in the just added constant.
-
Define the name of the anyLogistix project that you will be connecting to by adding the following constant (the constant already contains the name of the
project that we created in Phase 1 of this tutorial):
public static final String PROJECT_NAME = "API_tutorial"; -
Define the path to the MS Excel file containing the required scenario by adding the following constant (the name we refer to in this tutorial is
Example1.xlsx):
public static final String IMPORTING_FILENAME = "C:/api_tutorial/name-of-the-importing-scenario.xlsx";
With the next step we will add API client objects and executable code that will interact with anyLogistix (send requests, commands, receive responses). All the required information wil be received through them.
To define the boundaries of the code that must be executed, we will define all API requests within the main() method. This is done for demonstration purposes only to easily run the code from the editor's gutter panel:
public static void main(String[] args) throws ApiException {
        System.out.println("API Tutorial welcomes you");

}
Add API client objects to the java class
-
Add API client object that will use the provided server address and API key:
// This object creates connection to the anyLogistix Professional Server var apiClient = new ApiClient(); apiClient.setBasePath(ALX_SERVER_ADDRESS); // This object authenticates via the provided API key var apiKeyAuth = (ApiKeyAuth) apiClient.getAuthentication("ApiKey"); apiKeyAuth.setApiKey(ALX_API_KEY); -
Now add the object that will execute the code that we will provide to communicate with the anyLogistix Professional Server:
// This object executes all API methods
var api = new OpenApiApi(apiClient);
apiClient.setReadTimeout(50000);
It is time to add API requests to communicate with anyLogistix.
First we need to connect to the project. This can be done with the following methods:
- openProject() — opens the project using its ID.
- findAndOpenProjectByName() — opens the project using its name. We will use this method, since we already know the name of our anyLogistix project.
Open project via API request
-
Declare a new projectData variable (within the main() method) that will contain the project
data, which is returned by the findAndOpenProjectByName() method of the
api object with two arguments:
- true — the boolean value for the fullMatch argument, meaning that we are looking for the project with a name that fully matches the one we defined in the constant.
- PROJECT_NAME — the project name constant.
-
To trace that the project was successfully opened, we will add a message with the System.out.println() method.
Finally, it should now look like this:
var projectData = api.findAndOpenProjectByName(true, PROJECT_NAME);
System.out.println("Opened project: " + projectData);
Now that we have access to the required project we can import our scenario.
Import scenario via API request
-
Declare a scenarioData variable (below the defined project API request) that will contain the scenario data.
As its value, we will assign the importScenario() method of the api object with two
arguments:
- projectData.getId() — the getId() method of the projectData object that returns the anyLogistix project ID, to which the scenario must be imported.
- new File(IMPORTING_FILENAME) — creates a new File object with the IMPORTING_FILENAME constant as an argument that contains the path to our file that we will be importing.
-
To trace that the scenario has been successfully imported, we will use the System.out.println() method with two arguments:
- "Imported scenario: " — the text message in String data type.
- scenarioData.getName() — the getName() method of the scenarioData object that returns the scenario name.
var scenarioData = api.importScenario(projectData.getId(), new File(IMPORTING_FILENAME));
System.out.println("Imported scenario: " + scenarioData.getName());
Now that we have imported our scenario, we can connect to the Simulation experiment, and request to run it.
Connect to the Simulation experiment via API request
-
Call the getExperiment() method of the api object to get the experiment of a given type
(available for this scenario). Now pass two arguments to it:
- ApiBasicRun.TypeEnum.SIMULATION.getValue() — we return the value of the required experiment (Simulation in our case) by using the getValue() method of the SIMULATION object from the ApiBasicRun class. This will allow us to interact with the Simulation experiment.
- scenarioData.getId() — the getId() method of the scenarioData object returns the scenario ID. This way we define the scenario, for which the Simulation experiment must be run.
-
Now that we know the experiment type, we declare a simulationExperiment variable of
ApiSimulationRunConfigurationWrapper type and assign (ApiSimulationRunConfigurationWrapper) as its value.
The variable now has a specific experiment assigned to it.
This wil allow us to work with the Simulation experiment.
anyLogistix API offers different configuration classes to interact with experiments. You can use either an abstract class ApiARunConfigurationWrapper or a specific class for the required experiment. We will use the ApiSimulationRunConfigurationWrapper class, since we intend to run the Simulation experiment.
-
We will need to get the experiment's ID to later run it, so we will create a simulationRunConfiguration variable,
the value of which will return the experiment's settings via the getConfiguration() method of the
simulationExperiment object.
Finally, it should now look like this:
ApiSimulationRunConfigurationWrapper simulationExperiment = (ApiSimulationRunConfigurationWrapper)
            api.getExperiment(ApiBasicRun.TypeEnum.SIMULATION.getValue(), scenarioData.getId());
var simulationRunConfiguration = simulationExperiment.getConfiguration();
Run the Simulation experiment via API request
- First, we will create a message to notify us that the experiment has been started by adding the System.out.println(); method. Type the "Simulation experiment started..." String value as its argument.
-
Now create a new simExperimentResult variable of ApiExperimentResult type.
Then assign the runExperimentSynchronously method of the api object as the variable's value.
This will allow us to run the experiment.
To pass the ID of the experiment that we need to run we will add the simulationRunConfiguration.getId() argument to the method.
Here the getId() method returns the ID of the experiment from the simulationRunConfiguration
object that we created in the previous step:
ApiExperimentResult simExperimentResult = api.runExperimentSynchronously(simulationRunConfiguration.getId()); -
To logically conclude the api request, we will add another message that will notify us that the experiment has been completed:
System.out.println("Simulation experiment completed...");Finally, it should look like this:
System.out.println("Simulation experiment started...");
ApiExperimentResult simExperimentResult = api.runExperimentSynchronously(simulationRunConfiguration.getId());
System.out.println("Simulation experiment completed...");
That's it. We have created all the required API requests to run the experiment.
But before we run the Simulation experiment, let us create a request that will output the list of dashboard pages with charts that contain the experiment's result.
Output the list of experiment's statistics
The list that will be returned depends on the dashboard setup of the scenario that you will import.
-
Create a new experimentDashboardPages variable of List type.
Now assign api.getExperimentDashboardPages(simExperimentResult.getExperimentResultId()) as the variable's value. Here the getExperimentDashboardPages method of the api object will return the pages from the result of the experiment by its ID, a call to which is made by the getExperimentResultId() method in the argument.ListexperimentDashboardPages = api.getExperimentDashboardPages(simExperimentResult.getExperimentResultId()); -
Now we will use the for statement to create the loop with a new dashboardPage iterating over the
experimentDashboardPages list of dashboard pages.
To have the list in our console output we will use the System.out.println() method, the argument of which returns the name of the pages via the
getName() method of the just created dashboardPage object.
for (var dashboardPage : experimentDashboardPages) { System.out.println(dashboardPage.getName()); } -
And let us add another loop in the same way to iterate over the list of charts each page contains, and have that list output in the console:
Finally, it should like this:for (var dashboardChartData: dashboardPage.getCharts()) { System.out.println("\t" + dashboardChartData.getName()); }ListexperimentDashboardPages = api.getExperimentDashboardPages(simExperimentResult.getExperimentResultId()); for (var dashboardPage : experimentDashboardPages) { System.out.println(dashboardPage.getName()); for (var dashboardChartData: dashboardPage.getCharts()) { System.out.println("\t" + dashboardChartData.getName()); } }
At last, we can run our application.
Run the application and observe the output
-
Right-click ApiTutorialPhase1 class file in the project tree, then select Run from the context menu.
If you have anyLogistix Professional Server window open at this point, you will see the importing process live.
-
Check the console, you will see that it worked well, we can trace the start and end of the experiment, as well as the list of all pages and charts
the experiment results offers.
- Application output
-
7:36:29 PM: Executing task ':ApiTutorialPhase1.main()'...

> Task :compileJava
> Task :processResources NO-SOURCE
> Task :classes

> Task :ApiTutorialPhase1.main()
API Tutorial welcomes you
Opened project: class ApiProjectResponse {
    accessible: true
    creationDate: 2024-11-22T15:41:47.515954Z
    currentUserId: 9
    deleted: false
    id: 5089468
    name: API_tutorial
    ownerUserId: 9
}
Imported scenario: Example1
Simulation experiment started...
Simulation experiment completed...
Profit and Loss Statement
	Profit and Loss Statement
	Profit, Revenue, Total Cost
	Revenue, Total Cost
Service Level
	ELT Service Level by Products (Per Product)
	ELT Service Level by Products (Per Source)
	ELT Service Level by Revenue (Per Object)
	Service Level by Products (Per Product)
	Service Level by Products (Per Source)
	Service Level by Revenue (Per Object)
Lead Time
	Lead Time
	Max Lead Time
	Mean Lead Time (Best-Mean-Worst)
Available Inventory
	Available Inventory
	Available Inventory Including Backlog
	Average Daily Available Inventory
	Average Daily On-hand Inventory
	On-hand Inventory
Peak Capacity
	Peak Capacity
	Peak Capacity
Fulfillment
	Demand Placed, Fulfillment Received (Accumulative)
	Demand Placed, Fulfillment Received (Accumulative, Per Object)
	Demand Placed, Fulfillment Received (Daily)
	Demand Placed, Fulfillment Received (Daily, Per Object)
	Demand Received, Fulfillment Shipped (Accumulative)
	Demand Received, Fulfillment Shipped (Daily)
Used Vehicles
	Average Number of Vehicles Used
	Max Number of Vehicles Used
	Shipped Vehicles
-
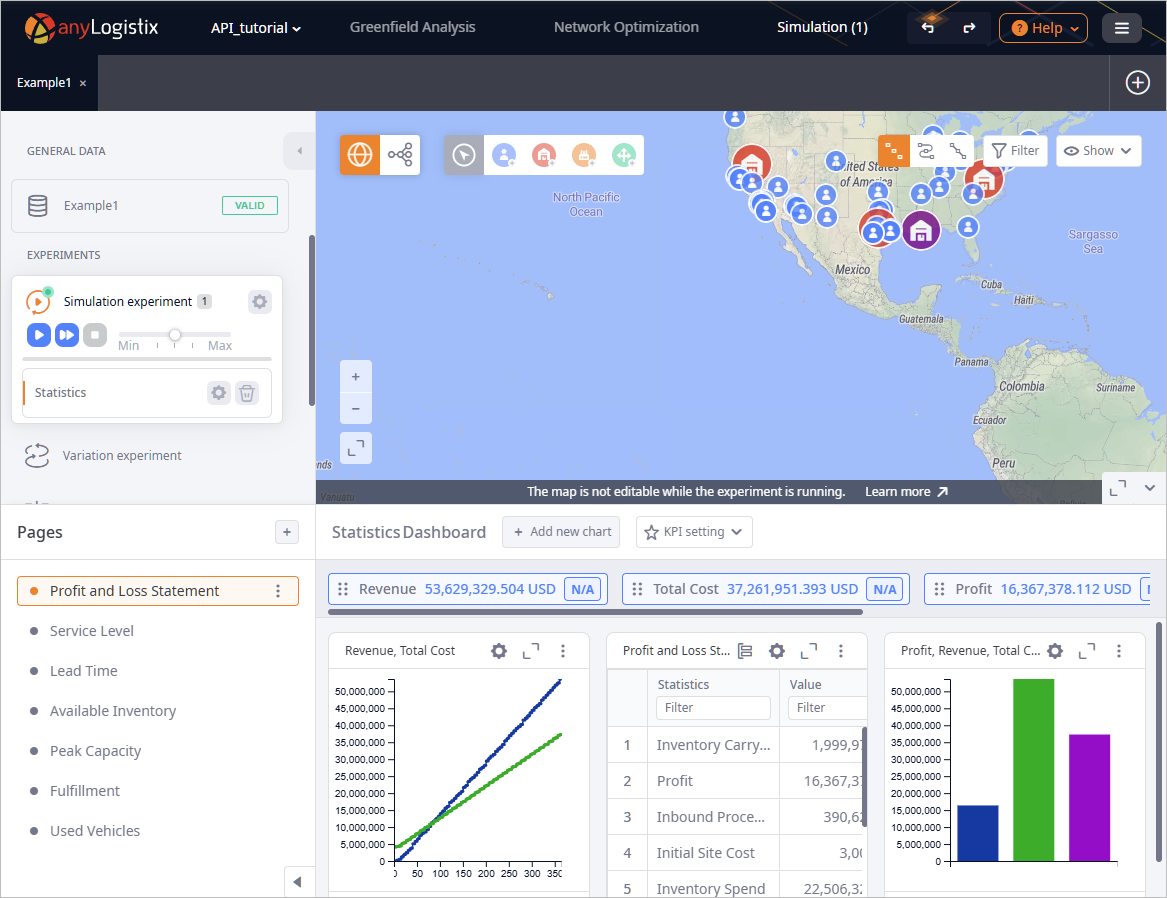
Open the web browser page with anyLogistix Professional server.
You will see, that the scenarios ribbon now contains our Example1 scenario, and the Simulation experiment
tile has a new result available in the Statistics item.
Below you can find the complete content of the ApiTutorialPhase1 file that we have created in Phase 1 and Phase 2 of this tutorial and have just used to communicate with the anyLogistix server:
- ApiTutorialPhase1
-
package openapiusage; import org.alx.openapi.v1.ApiClient; import org.alx.openapi.v1.ApiException; import org.alx.openapi.v1.api.OpenApiApi; import org.alx.openapi.v1.auth.ApiKeyAuth; import org.alx.openapi.v1.model.ApiBasicRun; import org.alx.openapi.v1.model.ApiDashboardPage; import org.alx.openapi.v1.model.ApiExperimentResult; import org.alx.openapi.v1.model.ApiSimulationRunConfigurationWrapper; import java.io.File; import java.time.LocalDateTime; import java.util.List; public class ApiTutorialPhase1 { public static final String ALX_SERVER_ADDRESS = "https://your-server-address-here.com/api/v1"; public static final String ALX_API_KEY = "your-api-key-here"; public static final String PROJECT_NAME = "API_tutorial"; public static final String IMPORTING_FILENAME = "C:/api_tutorial/name-of-the-importing-scenario.xlsx"; public static void main(String[] args) throws ApiException { System.out.println("API Tutorial welcomes you"); // This object creates connection to the anyLogistix Professional Server var apiClient = new ApiClient(); apiClient.setBasePath(ALX_SERVER_ADDRESS); // This object authenticates via the provided API key var apiKeyAuth = (ApiKeyAuth) apiClient.getAuthentication("ApiKey"); apiKeyAuth.setApiKey(ALX_API_KEY); // This object executes all API methods var api = new OpenApiApi(apiClient); apiClient.setReadTimeout(50000); // Here we connect to the existing project var projectData = api.findAndOpenProjectByName(true, PROJECT_NAME); System.out.println("Opened project: " + projectData); // Here we import scenario var scenarioData = api.importScenario(projectData.getId(), new File(IMPORTING_FILENAME)); System.out.println("Imported scenario: " + scenarioData.getName()); // Now we tell antLogistix that we want to run the Simulation experiment ApiSimulationRunConfigurationWrapper simulationExperiment = (ApiSimulationRunConfigurationWrapper) api.getExperiment(ApiBasicRun.TypeEnum.SIMULATION.getValue(), scenarioData.getId()); var simulationRunConfiguration = simulationExperiment.getConfiguration(); // Finally, we run the Simulation experiment System.out.println("Simulation experiment started..."); ApiExperimentResult simExperimentResult = api.runExperimentSynchronously(simulationRunConfiguration.getId()); System.out.println("Simulation experiment completed..."); // And here we get a list of dashboard pages (and their content) from the experiment's result ListexperimentDashboardPages = api.getExperimentDashboardPages(simExperimentResult.getExperimentResultId()); for (var dashboardPage : experimentDashboardPages) { System.out.println(dashboardPage.getName()); for(var dashboardChartData: dashboardPage.getCharts()) { System.out.println("\t" + dashboardChartData.getName()); } } } }
We have completed Phase 2 of our API tutorial. Let us move on to Phase 3.
-
How can we improve this article?
-