A scenario template is an empty file with proper anyLogistix naming and formatting. This can be an MS Excel file or a database with the exported scenario. The exported scenario will contain all the scenario's data.
To create a scenario template
- Create a new scenario in anyLogistix.
- Optionally you may add records to the data tables of the new scenario that will serve as examples of data values.
- Export the created scenario to a new MS Excel file or a
database.
The file will contain the worksheets corresponding to the anyLogistix data tables as well as examples of the inserted data values.
Empty tables and default data are not exported unless the Export empty data tables option is enabled in the export dialog.
You can now fill the exported file with your own data to later import it to anyLogistix as a new scenario.
The template comprises the following types of sheets:
Both the MS Excel file and database have the same content structure with the following differences:
- The Agenda table is not available in the database template.
- All parameters that are split into several cells in the Excel template (e.g. inventory policy parameters) are stored in a separate database table named export_scenarioType_custom_parameters_entries.
-
The names of the tables in the database start with export_, and additionally contain the type of scenario, and the column name
(if a new table in the database is created to hold data from a certain column of the parent anyLogistix table), e.g.
export_sim_cash_accounts_facilities.
Additionally see section Several sheets holding data from one anyLogistix table for types of content stored outside of the parent table.
- Agenda — (MS Excel template only) the list of all sheets this file contains.
- export_scenarioType_custom_parameters_entries — (database template only) the parameters of the input data that are split into several cells in the Excel template.
- Scenario settings — the basic scenario settings.
- Experiments and their settings:
- Experiments — the parameters of all the experiments of this scenario type.
- Experiment Statistics Settings — the parameters of all the statistics of this scenario type.
- Experiment Dashboards — the parameters of all the statistics that are present on the dashboards of all experiments of this scenario type.
- Variations — the Variable parameters defined in the Variation experiment settings.
- Project units — the measurements units of the project, in which this scenario was created.
- Project Unit Conversions — the conversion rules of the Project units.
- Icons — the set of all icons (default and custom) that are used in this scenario.
- Tables — one sheet per table, but there are cases when several sheets hold data from one table.
Scenario's content is distributed over the sheets in a comprehensible form, where each value occupies its own cell.
However several cells may also be allotted in the template sheet to describe the value of initially one cell.
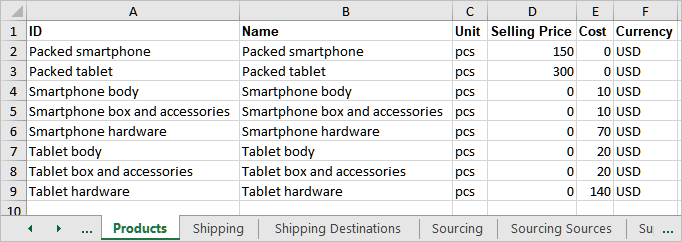
Below you can see a simple example of the Products table:
- In the exported sheet, which also has the ID column:
- In the anyLogistix table:
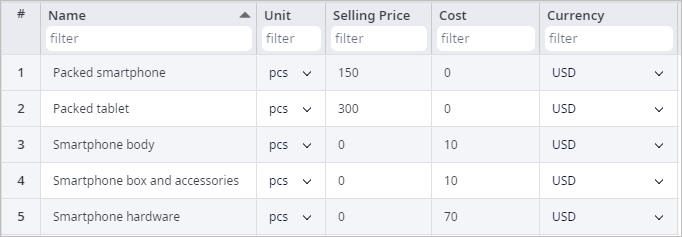
Additionally to the data that you see in anyLogistix tables, the exported file has the ID column, which is initially present in the scenario but is not visible in the user interface. This identifier serves to keep track of (link to/reference) the object regardless of its editable name.
You may change IDs while working with the exported scenario, but make sure that:
- The new ID does not duplicate the name of the existing ID.
- The existing ID that you are renaming is renamed in all of its instances.
There can't be two different objects with the same ID.
You may find the same IDs in various sheets of the MS Excel file / database tables. Those are not duplicates, but references to the object/record that has this ID. This is possible:
- Within the same sheet / table.
Below you can see the data from the Groups Customers sheet, which is basically a list of customers from the Customer group. We can tell that by looking at the Groups ID column.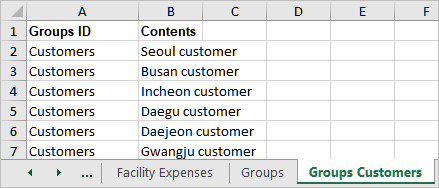
- Throughout the different sheets / tables that contain data referencing object from other sheet / table.
In our case that would be the ID of the Customers group in the Groups sheet, which contains all groups from the scenario. Here we have the actual object, to which the items from the Groups Customers sheet are referring to. This is how you can have the same ID in various sheets, but all of those IDs belong to one and the same object. You can't have e.g. 2 different groups with the same ID.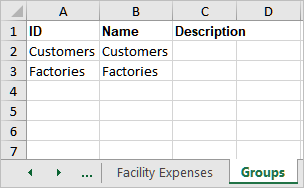
By default data of a table is stored within 1 sheet/database table that has the name of this table. However, you might find several sheets with data belonging to one table.
The Agenda sheet is updated when you export a scenario. But if you are adding new sheets to the exported MS Excel template, then you should also update the Agenda sheet manually before importing it.
The name of such sheets comprises the name of the original table + the name of the column whose data is stored in this particular table.
For example, the By-Products and the Components specified in the BOM table will be exported to the:
- Bom By-Product and Bom Components sheets respectively in the MS Excel file. The sheet of the original table is called BOM.
- export_sim_bom_by-products and export_sim_bom_components tables respectively. As you can see the tables here also have the scenario type name in it (sim in this case). The original table is called export_sim_bom (in case of Simulation scenario type).
This type of data organization is possible if the data in the anyLogistix table is defined:
- In more than 1 000 000 records. In this case the exported file will have a new sheet for every 1 000 000 records in such table (MS Excel only).
- By a list, which is any group of objects that is created in the corresponding table (Groups, Period Groups,
Product Groups).
For example, a group of customers that is created in the Groups table. If we export this scenario, we will see that the Groups table contains the ID and Name columns only. The content of this group is stored in a separate table (Groups customers in an MS Excel file, and export_sim_groups_customers in a database).
-
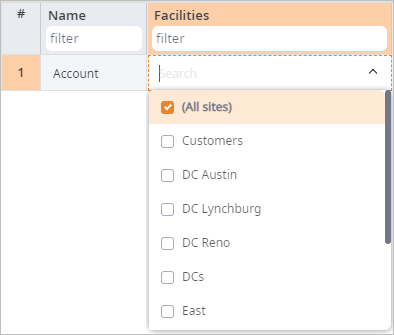
By a multiple selection in a drop-down menu.
Such content is stored in a separate table (e.g. Cash Account Facilities in an MS Excel file, and export_sim_cash_accounts_facilities in a database).
-
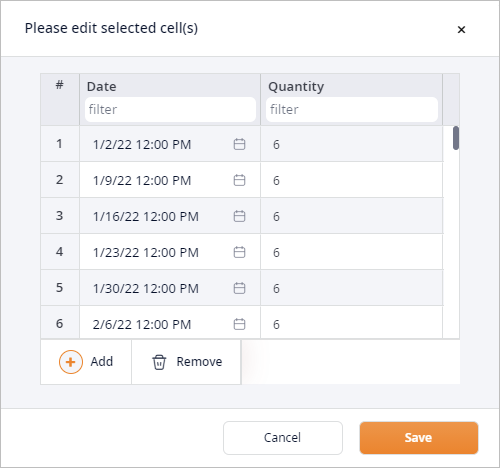
By a list with values. Here belong: the Components that you define in the BOM table, the parameters of the
Historic demand, etc.
The content of this group is stored in a separate table (e.g. Historic Demand in an MS Excel file, and export_sim_historic_demand in a database).
-
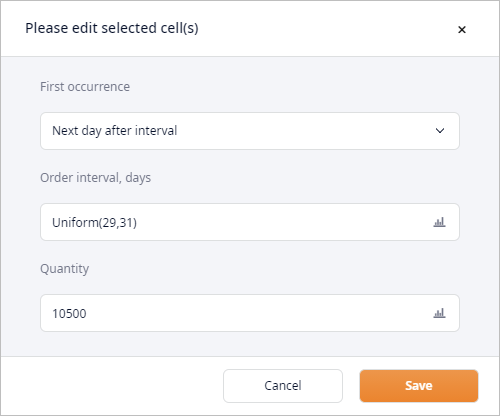
By a set of parameters. Here belong: inventory policy parameters, parameters of the customized facilities (extensions), periodic demand parameters, etc.
The content of this data type is stored in the:
- Sheet of the original table (the Demand sheet or other corresponding sheet) in case of an MS Excel file.
- export_sim_custom_parameters_entries table in case of a database.
All data of this type is stored in this single database table.
-
It may be a combination of the above-mentioned types resulting in numerous auxiliary sheets/tables.
As for instance, when exported, the anyLogistix Sourcing table may have auxiliary sheets/tables for the:- Sources defined in the Sources column, since it is a drop-down list with multiple selection.
The data will be stored in the:
- Sourcing Sources sheet in case of an MS Excel file.
- export_sim_sourcing_sources in case of a database table.
- Parameters of the Split by Ratio (Multiple Sources) policy.
The data will be stored in the:
- SourcingData.STMSR sheet in case of an MS Excel file.
- export_sim_sourcingdata.sourcingtypemultiplesplitratio in case of a database table.
- Sources defined in the Sources column, since it is a drop-down list with multiple selection.
The data will be stored in the:
A table may have a value defined with an expression or a more complex parameter setting that is exported into several cells to make its further editing much easier.
The example below shows that one cell of the Policy Parameters column in the anyLogistix Inventory table occupies 4 cells in the Inventory sheet of the exported template.

The exported data contains ID references to the icons that are generated by anyLogistix on import.
![]()
If you're working with the exported scenario, editing data is much easier, since you can see the way data is stored and can add new data in a similar way. But if you're working with a blank scenario template, then plotting it with data might be a bit tricky.
We recommend that you should export scenario with data similar to what you're planning to insert into the template to have a better understanding of how it should be formatted.
While editing the template file, you can:
- Use expressions in the table cells (MS Excel template only).
This can be any function / expression that an MS Excel file understands.
Functions may slow down the importing process.
- Add a description or a comment in any required form to the right of the last table column (MS Excel template only).
It is prohibited to add data:
- Below the last table record. It will inevitably result in import errors.
- To the sheets: Scenario settings, Experiments, Experiment Statistics Settings, Experiment Dashboards, Icons.

To edit scenario template
This is an example of editing the MS Excel scenario template. For editing a database scenario template you should follow the same steps in the query editor.
- Open the exported scenario file.
You will see the Agenda sheet, listing the sheets this file contains.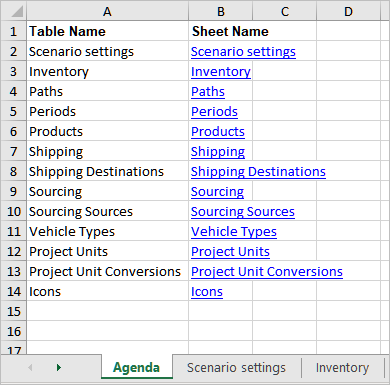
- Click the link in the Sheet Name
column to navigate to the exported data of the required table, e.g. Products.
As you can see, the table currently contains the default product only.
- Create a new product by filling the cells of line 3. You may do this in either of the following ways:
- Copy and paste the default product's data (and adjust it to avoid having two identical IDs/products) or
- Manually define the new data in the cells of the next line (third line in our case).
Make sure that the IDs differ. There should not be two identical IDs.

- Save the changes and import the updated scenario to anyLogistix.
The Products table now has 2 records.
You might need to add new sheets to the template (e.g.you are adding more than 1 000 000 rows). In this case you should also update the Agenda sheet.
To add a new sheet manually
- Create a new sheet in the scenario template. Name it in accordance with the template's naming convention.
We will be creating additional sheet for the historic demand data, so we will name it: Historic Demand1.

- Populate the sheet with the demand data. Note that the data formatting should be identical to the one in the Historic demand sheet.
- Now open the Agenda sheet and add a new record below the Historic demand record.
- Define:
- The name of the anyLogistix table (in the Table Name column).
- The name of the sheet storing the data for this table (in the Sheet Name column).

- Link the name of the new sheet to the Historic Demand1 sheet.

- Save the changes and import this scenario to anyLogistix.
-
How can we improve this article?
-

