

In this section you manage your projects and share access to them.
To open the Projects section
-
Open the control panel. Depending on your user type you:
- Initially enter the control panel on logging in if you are the product administrator, otherwise
-
In the anyLogistix toolbar click
 and select
 Control panel.
- The Projects section will open by default.
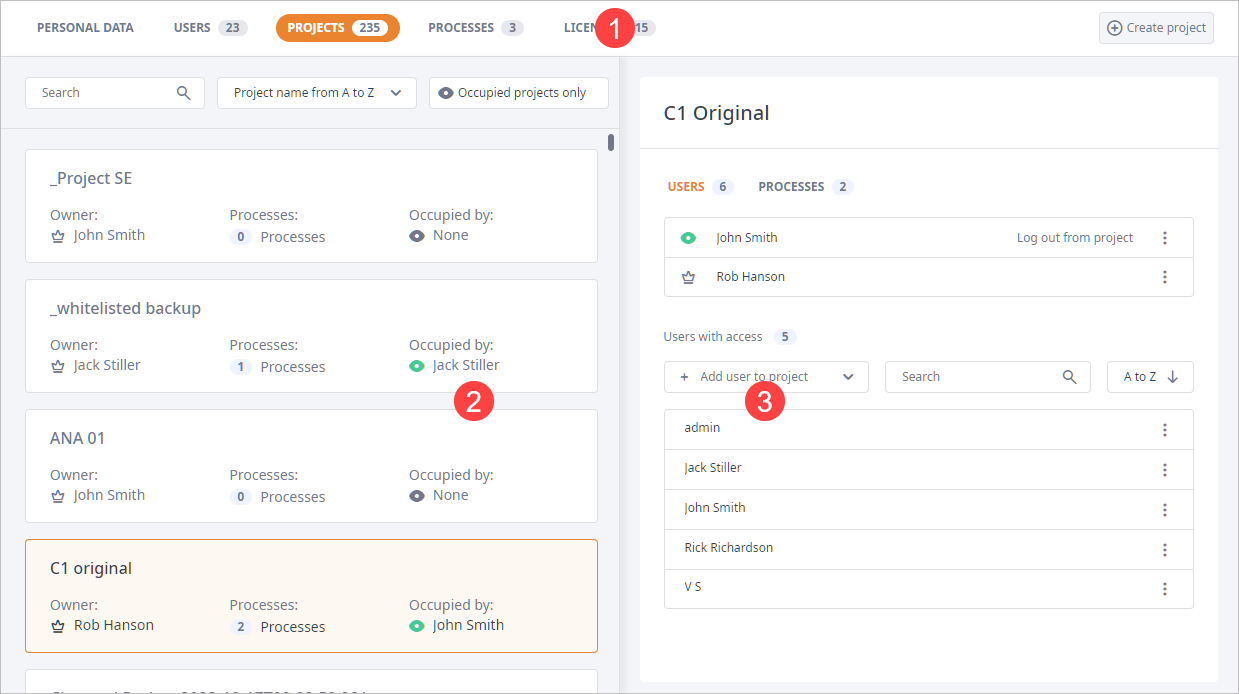
The PROJECTS section comprises:
-
The toolbar with the navigation tabs, and the
 button to create new projects.
- The left panel contains a list of all projects organized in tiles, and controls for searching, sorting, and filtering the list.
- The right panel contains the profile of the project selected in the left panel.
The header of the left panel contains the set of controls that differs depending on the Control Panel type:
- Administrator's Control Panel in the anyLogistix Professional Server
-

- Search — type the project name or the user owning / occupying the project to filter project tiles.
-
Sorting type:
- Project name from A to Z
- Project name from Z to A
- Owner name from A to Z
- Owner name from Z to A
- Creation date (ascending)
- Creation date (descending)
- Occupied projects only — enable to show only occupied projects.
- User's Control Panel in the anyLogistix Professional Server
-

- Search — type any keyword to find the tiles containing it.
-
Filter — use it to filter the list by the type of this user's rights:
- All projects — the list shows all projects created by all users.
- Projects with ownership — the list shows only projects this user owns.
- Projects with granted access — the list shows only projects this user was granted access to.
- Projects with no access — the list shows only projects this user has no access to.
- Sorting type:
- Occupied projects only — enable to show occupied projects only.
If the Default sorting is selected in the sorting drop-down list, the project tiles are grouped by ownership, and are shown in the following order (see below). Within each group the project tiles are sorted in the alphabetical descending sorting.
To apply alphabetical sorting without grouping by ownership, select From A to Z or From Z to A.
- The owned projects are always at the top of the list.
- Projects with access are below the owned projects.
- Finally, the projects that a user has no access to.
- User's Control Panel in the desktop version
-

- Search — type any keyword to find the tiles containing it.
-
Sort by — sort project tiles in the following order:
- Project name from A to Z — the default project sorting type.
- Project name from Z to A
- Creation date (ascending)
- Creation date (descending)
The body of the left panel contains project tiles that show data per project.
The content of the tile differs depending on the Control Panel type:
- Administrator's Control Panel in the anyLogistix Professional Server
-

- Tile title — contains the name of the project the tile belongs to.
-
Owner — shows the name of the project owner.
The
 icon is added to the owner's name.
- Processes — shows the number of running processes in this project. These are all currently running processes started by all users who have access to this project.
- Occupied by — shows the name of the user occupying the project.
- User's Control Panel in the anyLogistix Professional Server
-
-
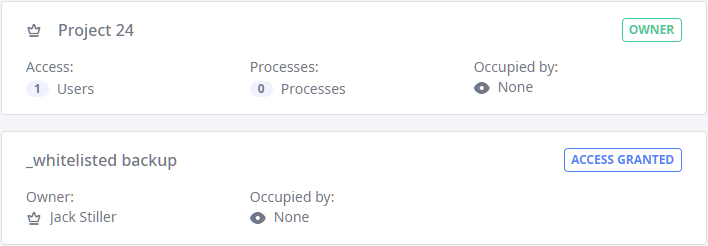
Tile title — contains the name of the project the tile belongs to.
The is added to the project name if the user is the owner of the project.
-
Access type label - indicates the type of access a user has:
-
 — user is the project owner.
-
 — access to this project has been shared for this user.
-
 — user has no access to this project.
-
- Access — [available for the project owner only] shows the number of users that have access to this project.
-
Owner — [available is the user is not a project owner] shows the name of the project owner.
The icon is added to the owner's name.
The icon is shown If the project has no owner.
- Processes — [available for the project owner only] shows the number of running processes in this project. These are all currently running processes started by all users who have access to this project.
- Occupied by — [available for users with access] shows the name of the user occupying the project.
-
Tile title — contains the name of the project the tile belongs to.
The
- User's Control Panel in the anyLogistix desktop version
-

-
Tile title — contains the name of the project the tile belongs to.
The icon is added to all projects names, since it is a single-user version.
- Date created — shows the project's creation data.
- Processes — shows the number of running processes in this project.
-
Tile title — contains the name of the project the tile belongs to.
The right panel contains the users and processes of the project selected in the left panel.
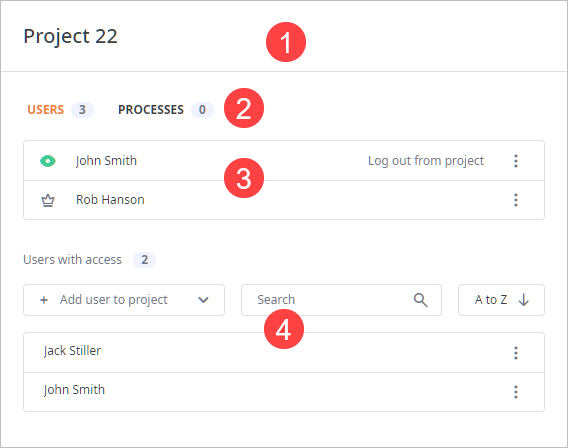
The project profile comprises:
-
Header with:
-
The project's name. The icon is added to all project names in the single-user version, and in the
user's Control Panel of the multi-user version (if this user is the project owner).
-
The
 Actions menu [available for the project owner only]:
-
 Rename project — click to rename the project.
-
 Remove project — click to remove the project.
You cannot delete the project you are currently occupying.
-
-
The project's name. The
- Section tabs for switching between the list of users and processes of this project [not available in the desktop version]:
- Project tile showing the owner and the user currently occupying the project.
- List of users / processes (depending on the selected tab) in this project.
The project tile differs depending on the Control Panel type:
- Administrator's Control Panel in the anyLogistix Professional Server
-

-
The user occupying the project.
- The name of this user.
- Log out from project — click to log out the user from this project.
-
The Actions menu:
-
 Open user details — click to navigate to this user's profile.
-
-
The owner of the project:
- The name of the project owner.
-
The Actions the actions menu:
-
Open user details — click to navigate to this user's profile.
-
Cancel ownership — click to remove owner rights.
The user will still have access to this project.
-
-
The user occupying the project.
- User's Control Panel in the anyLogistix Professional Server
-

-
The user occupying the project.
- The name of the user occupying the project.
- Log out from project — click to log out the user from this project.
-
The owner of the project (it is you):
- The name of the project owner.
- Cancel ownership — click to remove owner rights. The user (you) will still have access to this project.
-
The user occupying the project.
- User's Control Panel (as a guest) in the anyLogistix Professional Server
-

- The name of the user occupying the project.
- The name of the project owner.
- User's Control Panel (who has no access) in the anyLogistix Professional Server
-

- The name and the email of the project owner.
This section is not available in the Control Panel of the desktop version.
This section contains users that have access to this project, and controls for managing access to this project.
- The project tile a user is currently occupying.
- The list of users with access — the list of users who have access to this project.
The section title shows the number of users that have access to this project.
-
Control for managing the list of available users:
- Add user — use the drop-down list to share access to this project.
- Search — use search to filter the list of users who have access to this project.
- Sorting type — sort the list of users in the alphabetical ascending or descending order.
-
The list of users with access. Each record contains:
- The name of the user who has access.
-
The Actions menu to:
-
Assign as owner —
[available in the administrator's Control Panel only] select to assign this user as the owner for this project.
-
Open user details — [available in the administrator's Control Panel only]
select to assign this user as the owner for this project.
-
 Revoke access — click to ban this user from this project.
-
This section is not available for guest users and users who have no access to this project.
This section contains all processes running in this project that were started by any use with access to this project. It comprises:
- The project tile a user is currently occupying.
- The list of started processes — the list of processes running in this project.
-
Controls for managing the list of running processes:
-
List sorting types [available in the administrator's Control Panel]:
- Scenario name from A to Z — the default project sorting type.
- Scenario name from Z to A
- Owner name from A to Z
- Owner name from Z to A
- Type of process — the list will be sorted by the process type.
-
Search field [available in user's Control Panel of both server and desktop versions] allowing you to:
- Search by user — in the server version.
- Search by scenario name — in the desktop version.
- Stop all — click to stop all processes running in this project.
- Stop all except owner processes — [available in the administrator's Control Panel only] click to stop all processes started in this project by the invited users.
- Stop all except mine — [available in the user's multi-user Control Panel only] click to stop all processes started in this project by the invited users.
-
List sorting types [available in the administrator's Control Panel]:
-
The list of processes. The data is organized in table with each record showing data per running process:
- The name of the scenario, in which the process is running.
-
The name of the user, who started the process.
The icon is shown before the username, if this user is the
project owner.
- The status and the name of the running process
-
The button stopping the current process.
If you stop a process, it will be terminated. You cannot pause it this way, which means that a stopped process cannot be started again from the Control Panel.
-
How can we improve this article?
-